While on the road, you're likely packing just a compact digital camera. And during travels, your photo opportunites are often in shadowy locations or inside a building, which means you need to use the built-in flash on your point-and-shoot camera.
A lot of people, and camera manufacturers, prefer to push up the ISO number rather than use the camera flash gun. This is often the right choice, but sometimes you can't avoid using flash. And others it'll really make your shot.
Built-in flashes aren't as versatile as a dedicated flash gun on a hotshoe, flash bracket or off camera, but you have to work with what you have with you. Here are some tips on getting the most out of your camera's flash.
Get close to your subject
 Built-in flash guns are relatively weak. It has to run on the camera's battery, it's small, and because of this the flash light won't reach very far.
So to get the flash to light up your photo, you need to get within 10 feet or so (3 meters) of your subject.
If you can't do this, because you're across the street or in the back row of a concert, it's better to turn the flash off and use a higher ISO setting.
Use slow sync flash
 The major reason in-camera flash units create harsh photos is that they exclude the ambient light from the photo. A fast shutter speed will keep everything sharp, but also lit just by the electronic flash of light. As it's also straight on, the directional light can create some very unflattering shadows.
To get around this, set your camera's flash to use slow synchronization flash (slow sync). This means the camera will keep the shutter speed low, allowing more light in, and firing the flash sometime during the exposure to illuminate and freeze your subject in the photo. If you have a choice, it's best to use rear curtain sync, meaning the flash will fire at the end of the exposure time.
Bounce or diffuse your flash the DIY way
 A built-in flash gun can't normally bounce the light off a wall or other surface to soften it, and it won't have a built-in diffuser. These are two techniques professionals use to improve their flash photos. But just because the camera can't do it out of the box doesn't mean you are stuck with harshly lit flash photos. You can make a do-it-yourself diffuser or flash bounce.
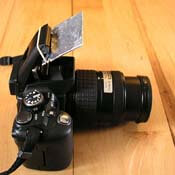
To make a diffuser, put some Scotch Magic tape over your flash unit. It won't stop the light coming through, but will diffuse it.
You can bounce light with a piece of white cardboard. Put it in front of your flash unit to bounce the light upwards or sideways.
Either way, you will be taking some power away from your flash light output. To counter this, increase your exposure by a stop or two to compensate. You'll have to experiment a bit with this, as the camera won't automatically know how much you're reducing the light falling onto your subject.
Learn to use fill-in flash
 Another professional tip is to use flash when it's light out as well. While shooting outdoors, a little flash light can fill in shadows in your subjects face to soften the photo. This is especially true in very sunny conditions like the tropics, or when the sun is behind your subject.
If you can, set your flash output to 1/4th of it's normal output. On some compact digital cameras, simply setting the flash to 'always on' will adjust the power to fill-in flash mode if it's light where you're taking pictures.
Now experiment
Try out these techniques before you go on your vacation, and you'll be prepared to use your camera's built-in flash to its full potential.
If you have any tips on using a built-in flash unit, please share it in the comments below.
You should follow me on twitter here.